There are now a huge number of AI-enabled code development tools. If you are tired of copying and pasting between an LLM in a browser and your editor, you should try AI-enabled code development tools.
An overview of AI development tools I wrote for E3SM is here
These tools need to be hooked up to an LLM. This usually involves buying a subscription but you can instead hook them up to Argonne's Argo service.
CELS general instructions for this are on this box document: https://anl.app.box.com/notes/1871610644419?s=hxc72dkm0a8mlmo7ownfl4ixwx6iu3ko. (This was originally part of a Vibe Coding workshop held at Argonne: https://anl.app.box.com/folder/316633295027?s=iva9qhm478a29pt3lt4yy53ubhdrs239.).
This page focuses on using AI-dev tools with Argo but outside the Argonne trusted network.
These instructions are for connecting AI development tools to Argo when outside of the Argonne trusted internal network using the argo-proxy developed by Peng Ding. They work for your laptop on your home network but also for machines on lcrc.anl.gov or alcf.anl.gov networks or really anywhere that can establish an ssh connection with Argonne.
If you are on the Argonne network (via VPN or being on campus) use the CELS instructions above.
To connect Argo to your tool from elsewhere, these instructions focus on 2 elements: The argo-proxy service running on a CELS or other machine AND an ssh tunnel from your external machine to that proxy instance.
These instructions assume the machine running the proxy is homes.cels.anl.gov. This works for any machine from which you can establish an ssh connection to homes.cels.anl.gov.
The proxy will keep running in your screen session after you log out. It will not need to be restarted unless homes gets rebooted. You can check how it is doing by logging back in to homes-01 (if that's where you started it) and doing "screen -r". Do "ctl-a-d" to put the screen in the background again. To actually stop the screen session, do "ctl-c" to stop the proxy, then type "exit".
From your laptop on your home network or other machine you want run AI tools and connect them to Argo:
ssh -4 -N -f -L 12345:localhost:12345 -J [email protected] [email protected]
http://localhost:12345/v1/. If you are using the Argonne network use https://apps-dev.inside.anl.gov/argoapi/v1To test that your tunnel is connected to the proxy: after you have started the tunnel, in another terminal on the same machine, do
> curl http://localhost:12345/v1/modelsThe result will be a long string listing all the models available.
If you use VScode to ssh to another machine to do development, start the tunnel from that machine, not your laptop. This is needed because VScode sets up a small server on the machine you ssh to and runs commands through that.
VScode by default comes with Copilot which has access to several LLMs but you need to buy a Copilot seat to use it. To use Argo with VScode, you need to add an AI extension that allows any AI provider such as Cline.
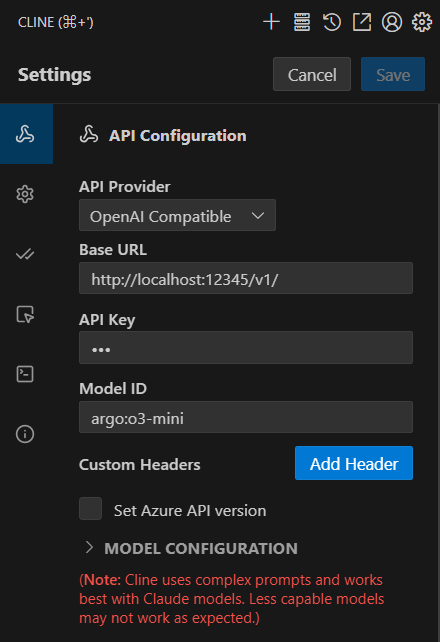
This is what the settings look like for Argo with Cline in VScode:
curl -fsSL https://claude.ai/install.sh | bash
{
"apiKeyHelper": "echo 'UserName'",
  "env": {
    "ANTHROPIC_BASE_URL": "http://localhost:12345",
    "CLAUDE_CODE_SKIP_ANTHROPIC_AUTH": "1"
    "ANTHROPIC_MODEL": "claudesonnet46",
    "ANTHROPIC_DEFAULT_OPUS_MODEL": "claudeopus47",
    "ANTHROPIC_DEFAULT_SONNET_MODEL": "claudesonnet46",
    "ANTHROPIC_DEFAULT_HAIKU_MODEL": "claudehaiku45",
    "DISABLE_AUTOUPDATER": "1",
    "USE_BUILTIN_RIPGREP": "0"
  },
  "model" : "opusplan"
}
Replace UserName with your Argonne user name. The ANTHROPIC_BASE_URL is supposed to end with the port number for Claude Code CLI app only. Also replace 12345 with your port number.
NOTES:
curl -fsSL https://opencode.ai/install | bash
{
  "$schema": "https://opencode.ai/config.json",
  "provider": {
    "Argo": {
      "npm": "@ai-sdk/openai-compatible",
      "name": "Argo",
      "options": {
        "baseURL": "http://0.0.0.0:12345/v1",
        "apiKey": "UserName"
      },
      "models": {
        "claudesonnet45": {
          "name": "Claude-4.5-Sonnet"
        },
        "claudeopus45": {
          "name": "Claude-4.5-Opus"
        },
        "claudehaiku45": {
          "name": "Claude-4.5-Haiku"
        },
        "gpt51": {
          "name": "GPT-5.1"
        },
        "gpt52": {
          "name": "GPT-5.2"
        },
        "gemini25pro": {
          "name": "Gemini-2.5-Pro"
        }
      }
    }
  }
}
Replace UserName with your Argonne user name and port number (12345) with your port number.